Getting started
After having created the [JCRC] - Jira Custom Related Columns custom field, you should set it up. To enter the configuration follow the steps below:
1. Go to
Jira Administration → Issues → Custom fields.
2. Click the more […] dropdown menu from the
Actions column of the JCRC custom field and select Configure.
3. Click Edit Customized Columns.
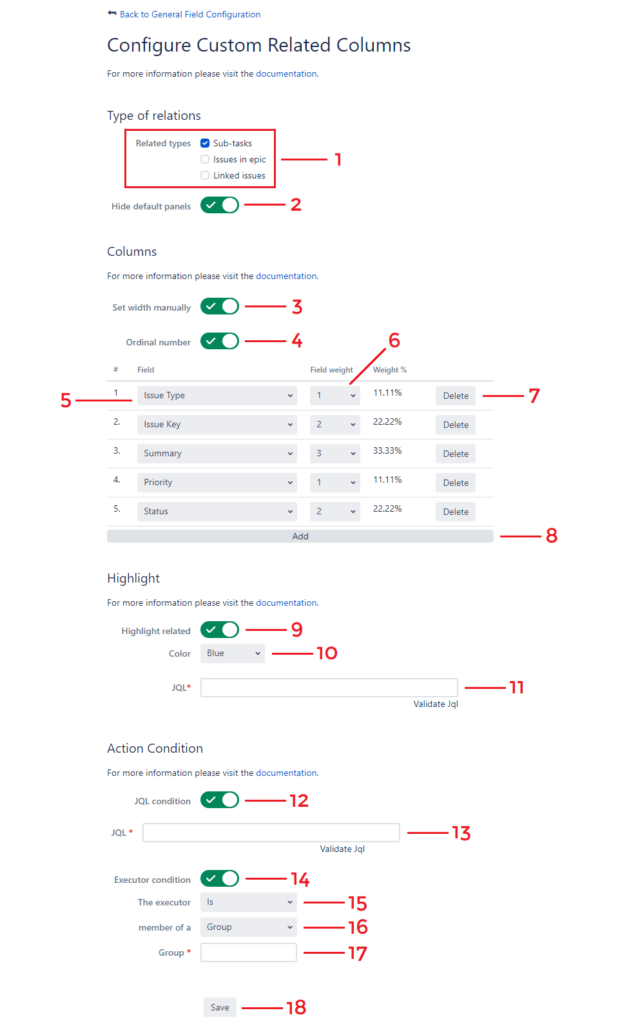
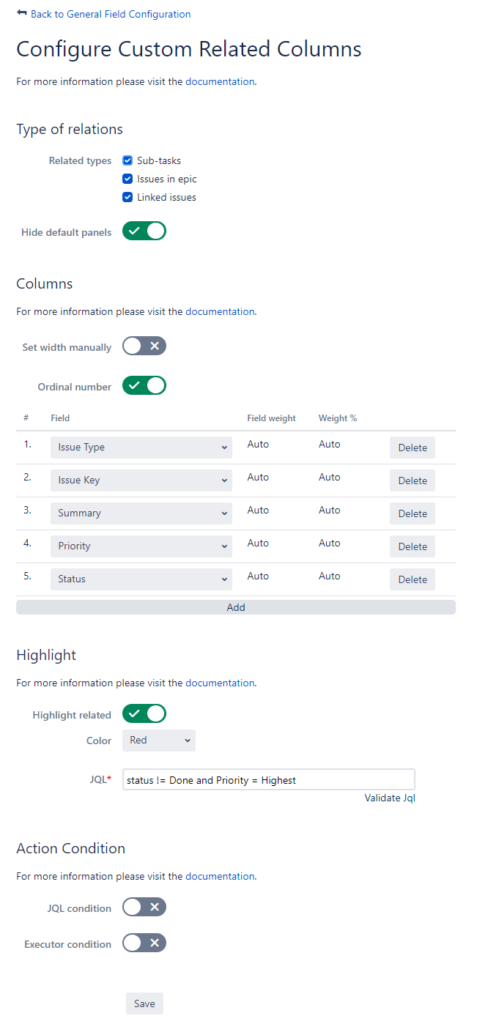
Available configuration options include:
1. Related types - select which custom panels will be created.
2.
Hide default panels - remove default Jira panels (only the ones selected in
Related types) from the issue view.
3.
Set width manually - set the width of columns in the custom panel based on the
Field weight value.
4.
Ordinal number - add the row ordinal number column to the custom panel.
5.
Field - field that will be displayed in the custom panel. The order of the fields in the table will be applied to the custom panel on the issue view.
6.
Field weight - number that describes the width of the field in relation to other fields in the custom panel.
7.
Delete - remove the field.
8.
Add - add a new field.
9.
Highlight related - show related issues that meet the JQL condition as highlighted.
10.
Color - color of the highlight.
11.
JQL - JQL query that has to be met by the issue in the custom panel to be highlighted.
12.
JQL condition - display custom panels only on issues that meet the JQL condition.
13.
JQL - JQL query that has to be met by the current issue to display the custom panels.
14.
Executor condition - the condition that has to be met by the current user to display the custom panels.
15.
The executor - select if the condition will include or exclude users
16.
member of a - type of membership
17.
Group / Project role - based on the
member of a, select the Jira user group or project role that the condition will check
18.
Save - save the configuration
Custom panels issue view
After the configuration of the
[JCRC] - Jira Custom Related Columns custom field, a new section
Jira Custom Related Columns will be displayed on the issue view. The section includes all custom panels configured in the custom field.
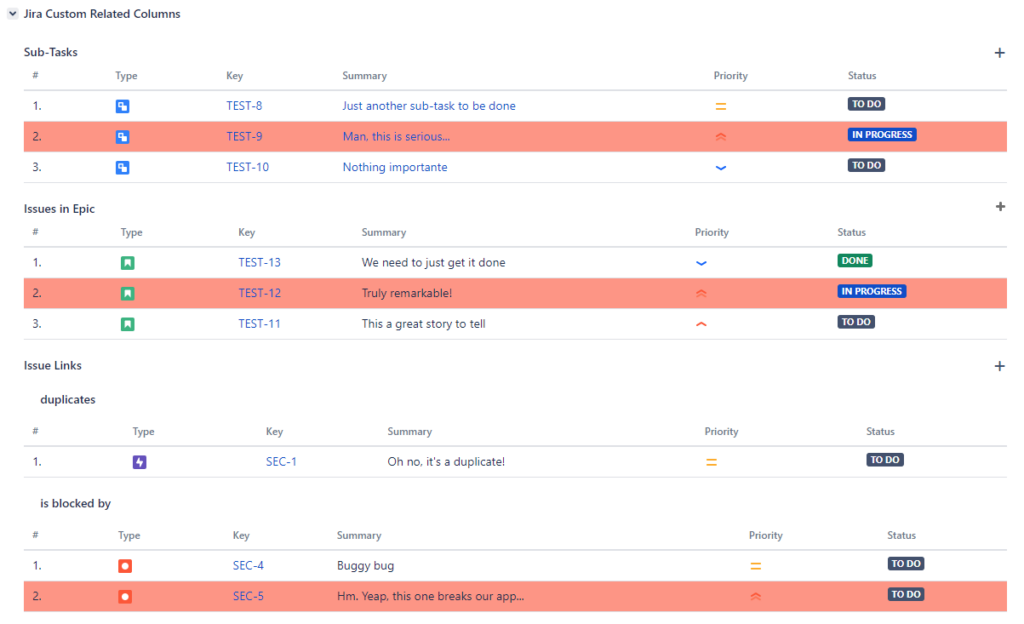
All custom panels display the fields and their order according to the configuration. Each panel can be sorted by clicking on the column header.
If the
Highlight related option was enabled and set up, the issues that meet the JQL query will be highlighted.
The
Issue Links custom panel has been divided into sections according to the link type.
Support and troubleshooting
If it happens that you come across a problem or have a question regarding JCNE, don’t hesitate and reach out to us through our support portal.
The support portal hands you the following types of requests to categorize your needs:
-Defect for reporting problems, bugs and other malicious behaviors
-New feature for requesting improvements and new functionalities
-IT Help for all other general questions about installation, licensing or configuration
Working hours
Minty Minds support operates every weekday from
9:00AM - 5:00PM PST. Our support crew will answer you within
24 hours.
Before you decide to contact our support due to a malfunction found in our add-on, we encourage you to do the following in order to conduct basic analysis:
-Make sure you are using the latest version of the add-on. If not, please update JCNE
-Enter the Safe Mode in Jira (for more information see Disabling and enabling apps) and enable JCNE only. Try to reproduce the defect. If the problem no longer exists, try to enable other apps one by one, testing JCNE each time. Finally, you should be able to find the app that is not compatible with JCNE and causes the malfunction
Test environment
It is highly recommended to test the Jira apps (or their updated versions) on a test environment prior to doing it on the production environment. Also testing the apps with Safe Mode should be performed on a test environment.
Finding a bug in a software application is always a disappointing experience. We do our best to keep our apps thoroughly tested, but if it happens that you encounter a bug, we encourage you to raise a defect ticket in our support portal. If you want to help our support crew solve your problem quickly, provide the following information:
-Detailed reproduction steps so that our engineers can duplicate the defect in the test environment
-Screenshots or video files presenting the problems as evidence
-Log files from Jira. There are two ways to get the log files:
-Copy from the Jira Home Directory: JIRA_HOME\log\atlassian-jira.log
-Generate the support zip. For more information see Create a support zip
-Information about your Jira and JCNE versions
Supported versions
Our support may refuse to process your request if either the version of your
Jira reached its EOL date or
JCNE version is not the latest available.