JSAB Jira Scaled Agile Board Documentation
Navigation
-Getting started
-Creating Scaled Boards
-Working with Scaled Boards
-Board List
-Board configuration
-Global configuration
-Support and troubleshooting
Getting started
Overview
Jira Scaled Agile Boards (JSAB) is a Jira app that introduces a completely new board type allowing to gather and manage many Scrum projects in one place. The visualization of the work planned for multiple teams spread across multiple sprints with the possibility to see the dependencies between tasks makes JSAB a perfect tool for large-scale Scrum projects.Installation
Permission required
Remember that in order to carry out the steps described below and install JCNE you have to be a Jira administrator.
From Jira
1. Click the Administration cog icon and select Manage apps2. Click Find new apps
3. Search for JCNE Jira Custom Notification Extension
4. Click the Install button
5.Click the Accept & Install button
From Atlassian Marketplace
1. Go to JCNE Jira Custom Notification Extension page on the Atlassian Marketplace2. Click the Get it now button
3. Go to Jira, click the Administration cog icon, and select Manage apps
4. Click Manage apps
5. Click the Upload app link, select the file downloaded in step 2 and click Upload
First steps with JSAB
After the installation is completed, your Jira will have a new menu item Scaled Boards and that’s the place where your journey with the app begins.
From here you can:
-create a new board using Create Scaled Board
-or view and manage existing boards with Manage Scaled Boards
Since you probably don’t have any boards yet, follow the steps below and create a new one!
1. Go to Scaled Boards → Create Scaled Board
2. Set the name of the board in the Board name field
3. Optionally add some details about your boards in the Board description field
4. In the Teams section add a new team
4a. Define the name of the team that will be used on the board
4b. Select a Scrum board that will be related to the team
4c. Click the plus icon
5. Optionally add more teams according to your needs
6. Click Create board
That’s it! Your first scaled board is up and running. It displays the teams along with the tasks planned for the respective sprints providing you a helicopter view of the situation in your project/s.
Next steps
Wondering what to do now? You can explore the rest of the documentation to find out what JCNE has to offer and take advantage of it. However, if you want to hop into action right away, just do it! JCNE is straightforward and user-friendly to let you enhance your processes quickly. If it happens that you need our assistance on any step of your journey with JCNE, just get in touch through our support portal or write a message at support@mintyminds.com.Creating Scaled Boards
New scaled boards can be created in Scaled Boards → Create Scaled Board.
Jira Scaled Agile Boards (JSAB) is a Jira app that introduces a completely new board type allowing to gather and manage many Scrum projects in one place. The visualization of the work planned for multiple teams spread across multiple sprints with the possibility to see the dependencies between tasks makes JSAB a perfect tool for large-scale Scrum projects.

Basic setup
When creating a new scaled board using the basic setup, you will need to provide the minimum information required. The default configuration will be applied to the board and it can be changed after the board is created.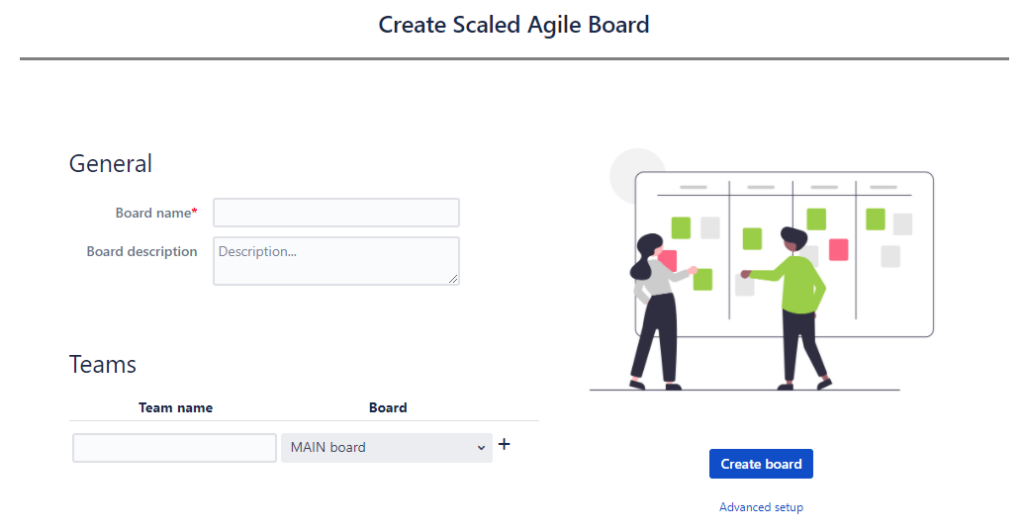
1. Enter the Board name. Make it meaningful. It could include the name of the project or product the board will be used to manage.
2. Optionally enter the Board description to explain the role of the board in more detail.
3. Add a new team. Provide the Team name to identify the group that is working on a specific project (or a part of it). Select the Board to indicate the Scrum board the team is working on. Click the plus icon.
4. Add more teams to include all teams that will be working on the project.
5. Click Create board to create your scaled board
The first team added is considered to be the core team and its Scrum board will be the reference one for the scaled board in terms of start/end sprint dates. In order for the scaled board to work correctly, the Scrum board of the first team needs to have active sprints.
Only Scrum boards are available for selection when adding a team to the board.
Advanced setup
If you don’t want to use the default configuration for your board, you can click the Advanced setup link to go through the board configuration wizard.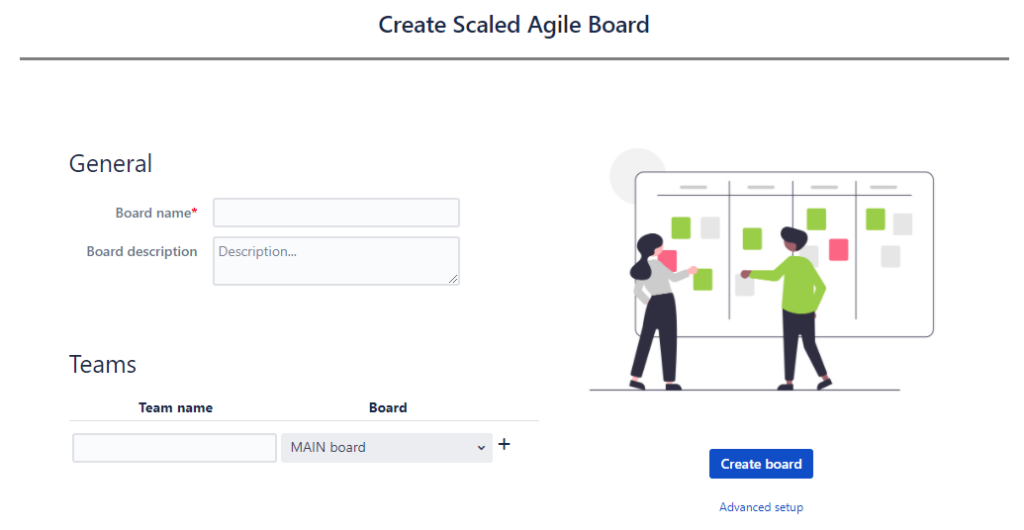
Basic
The step is the same as the basic setup. Please refer to the section Basic setup above on this page.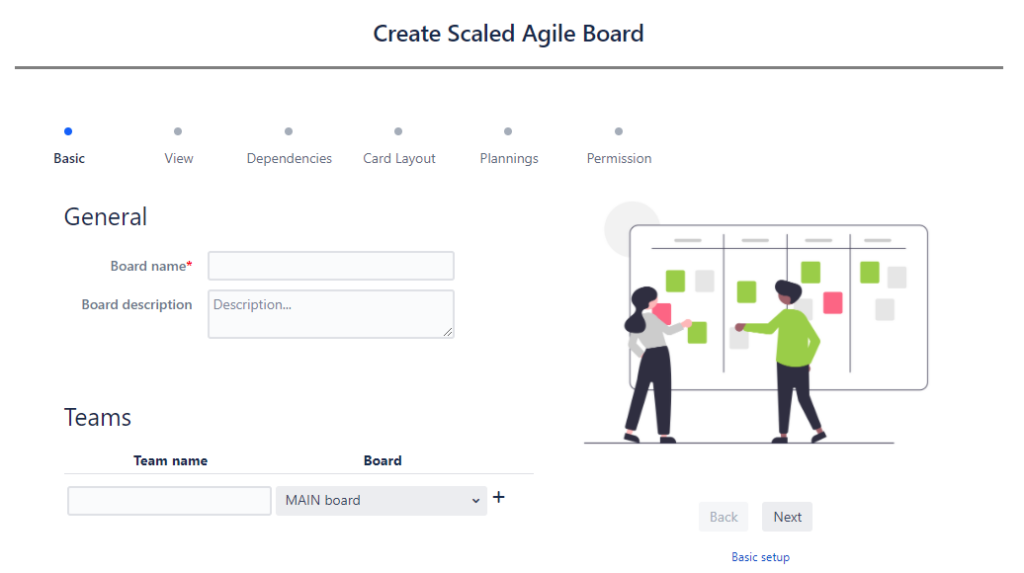
View
Configure the view of the board. Decide how sprints will be displayed and define resolutions considered as negative for issues.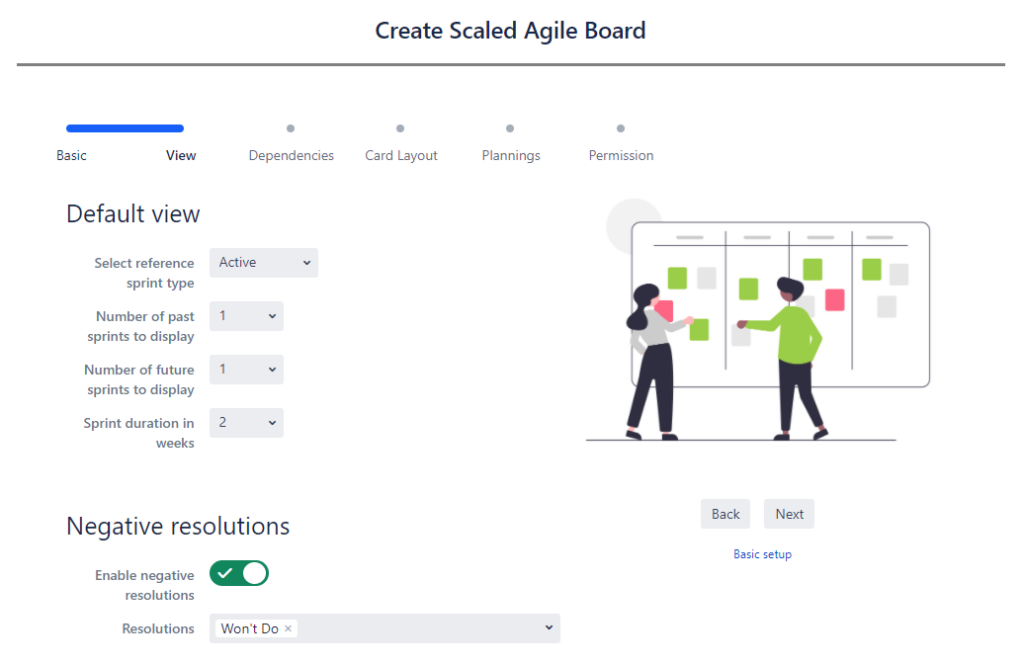
Default view
1. Set the Select reference sprint type to decide if the reference sprint should be the active or specific one. If the Selected was set, select the sprint in Select sprint. The sprint selected here will be focused by default when viewing the board.2. Choose how many past (completed) sprints will be displayed on the scaled board in the Number of past sprints to display.
3. Choose how many future sprints will be displayed on the scaled board in the Number of future sprints to display.
4. Set the duration of the sprint in Sprint duration in weeks.
Negative resolutions
Decide if issues with specific resolutions will be marked (crossed out) on the board’s view in the Enable negative resolutions. If the negative resolutions are enabled you can set Resolutions.
By default the Won’t Do, Rejected will be set in the Resolutions if found in Jira.
Dependencies
Visualize the relationships between different issues based on the issue links in Jira.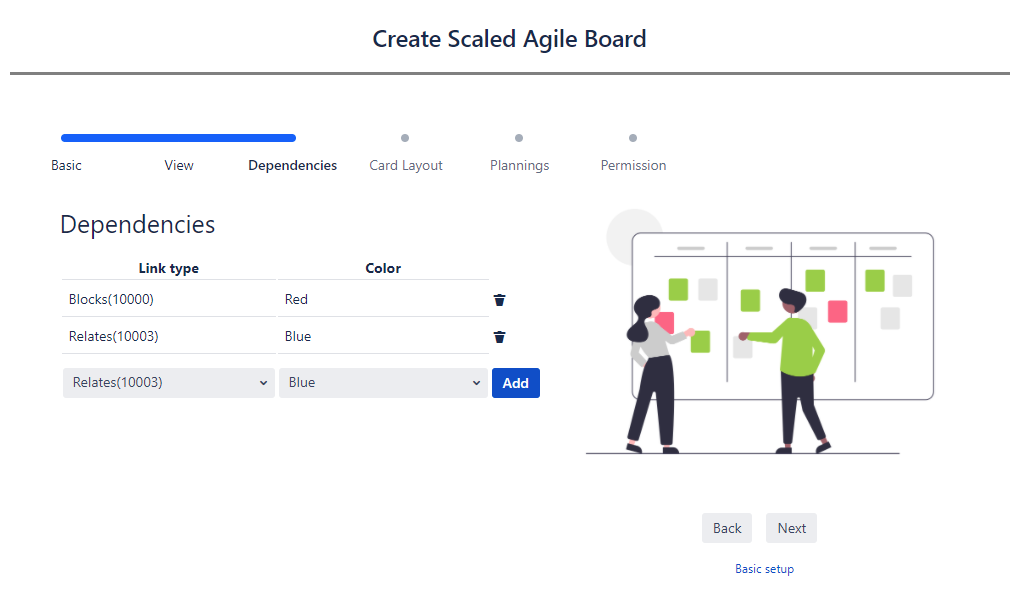
1. Select the Link type that will be visualized on the board.
2. Select the Color in which the link will be displayed.
3. Click Add.
Card Layout
Cards are a form of displaying issues on the board. You can configure the layout of cards to display different data from fields on the issue.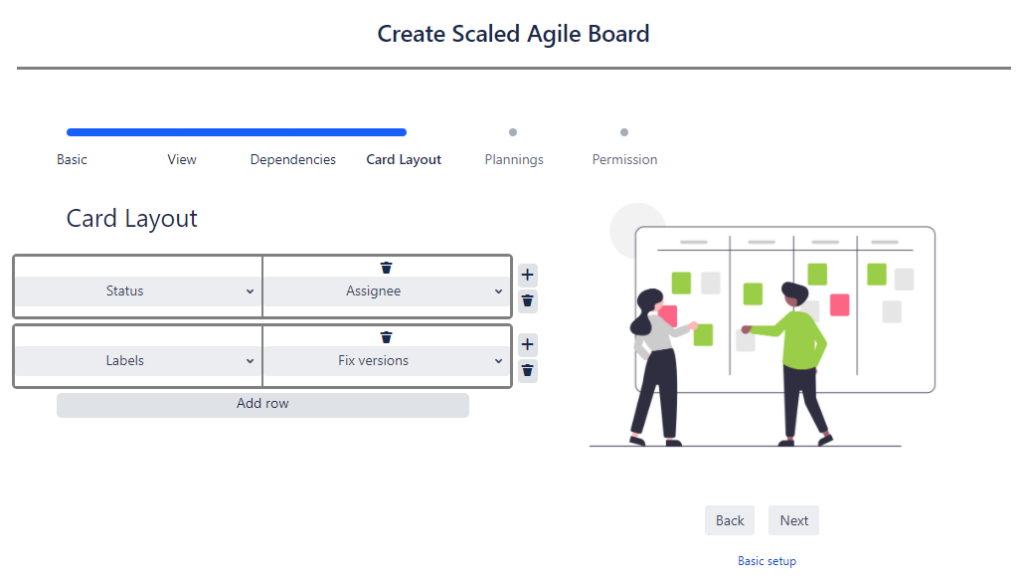
1. Add row to be able to configure fields and add cells.
2. Click the plus icon to divide the row into cells.
3. Select the fields in each cell to display it on the card/issue on the board.
You can have two rows and four cells in each row on your card layout.
Fields that can be set in the card layout are the Jira built-in custom field types and system fields. Non-standard fields introduced by other apps are not supported.
Plannings
Set the filters for planning columns used for displaying issues before and after planning work on the board.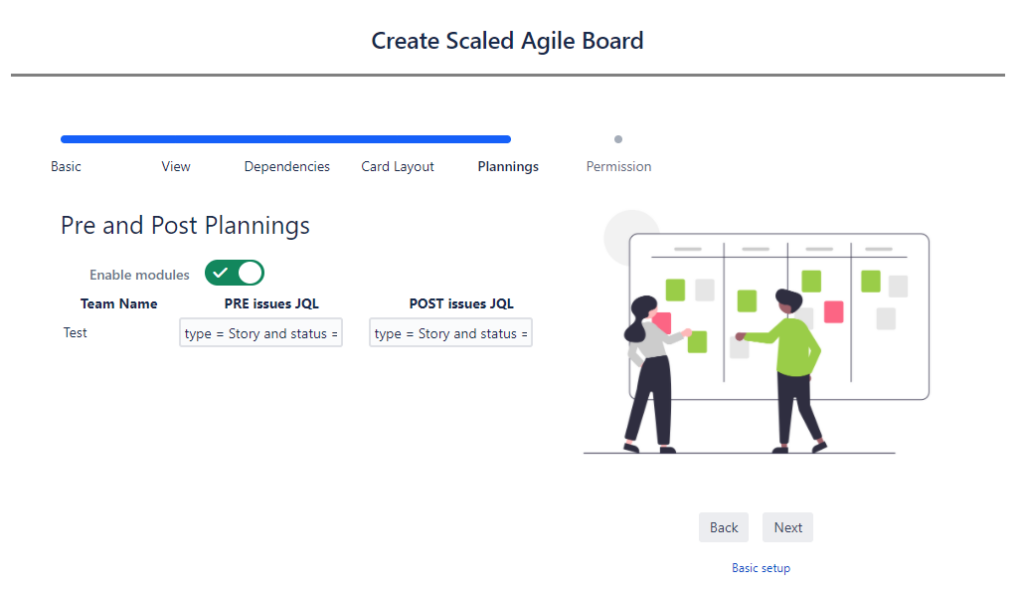
1. Enable modules to configure the columns.
2. Enter PRE issues JQL and POST issues JQL to set the filters that will display the issues in respective columns.
3. Define the filters for each team added to the board.
Permissions
You can grant permissions to the users of your board to separate the duties according to the roles. Following permission types can be set:-Access - permission to view the board, zoom in and out, move between future and past sprints, filter the view
-Work - permissions to move issues between sprints
-Administration - permissions to configure the board
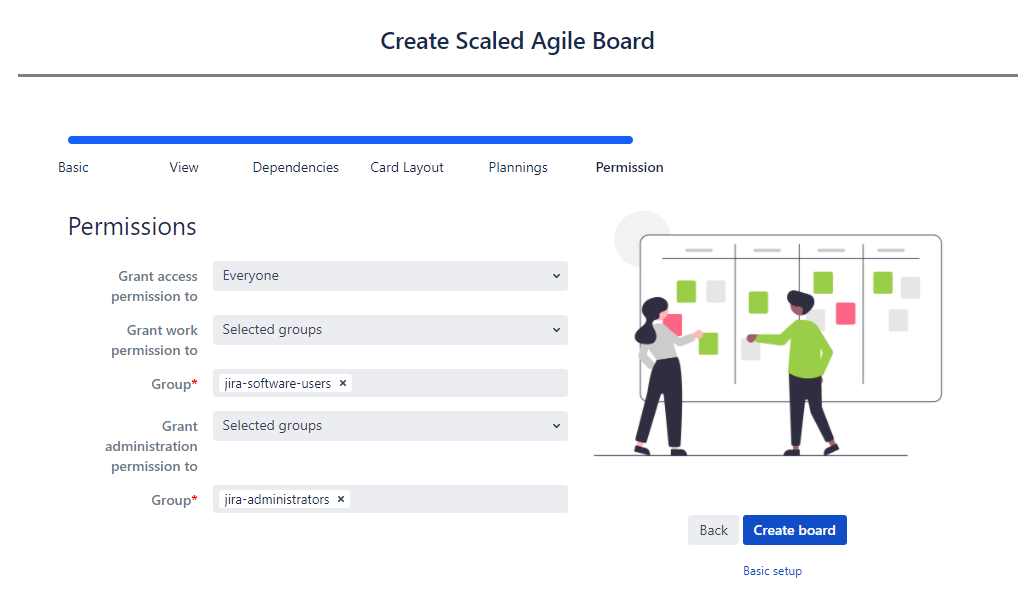
1. Each permission can be granted to Everyone, Only owner or Selected groups.
2. If you decided to grant the permission based on Jira user groups, such groups need to be set in the Group field
Global permissions defining the access to the JSAB app are superior to the board permissions i.e. if a user has access to the board, but doesn’t have access to the JSAB app, he will not be able to see the board.
The owner is the user that created the board.
Working with scaled boards
Scaled boards visualize the work planned and performed across multiple Jira Scrum boards in order to provide you an overview of a large-scale project that is being developed in multiple Jira projects. You can also change the views of the board depending on individual needs and manage the issues.
Accessing a board
Scaled boards can be accessed from:a) Boards list in span class="boldedText">Scaled boards → Manage Scaled Boards clicking on the name of the board

b) Favourite boards from the Scaled boards menu if any boards have been marked as favourite

Using board view
The board view displays all sprints from the Jira Scrum boards selected for the teams added to the scaled board.
The number of sprints displayed on a scaled board by default can be set in the configuration.
Sprints on a scaled board are described with Sprint Name and Goal as the header. Issues assigned to the sprint are displayed with the following information:
-Status category
-Issue type
-Issue key
-Summary
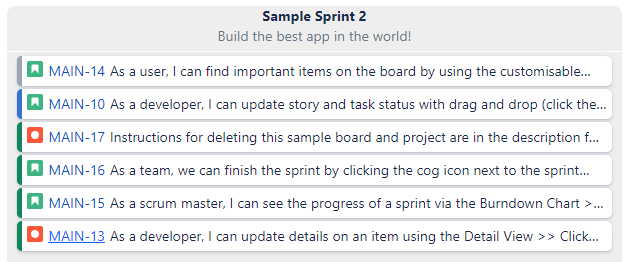
Issues that were not completed and have a negative resolution set will be crossed out. This state may indicate that the issue was e.g. rejected, canceled, closed as a duplicate.
The resolutions that will be treated as negative can be set in the configuration. If the default configuration is applied to the board, the negative resolutions are Won’t Do, Rejected, Canceled.
Issues can be moved between sprints of the same team (the same Jira board) using drag and drop. Only sprints that were not closed can have their scope changed. Issues moved to a different sprint will have that sprint changed in Jira. All the events applicable to such a change (e.g. a notification sending) will be triggered as if the sprint was changed in Jira directly.

Using the top bar
The top bar contains various actions that customize the view of the board.
1. Scope change panel allows you to change the visible on the board scope by moving to past or future sprints using arrows. You can also zoom the view in or out to see fewer or more sprints respectively.
2. Pre and post planning view shows the pre planning and post planning columns with issues according to the filters set in the configuration for each team.
3. Card view displays issues as cards with additional data.
4. Dependencies view displays the links between issues that are configured as dependencies for the scaled board. For the dependency to be visible, both linked issues have to be visible on the scaled board.
5. Epic view/Issue view hides the issues in sprints and shows the epics to which these issues belong.
6. Overview hides all issues on the board to show only the sprint name and goal to display the overview without details.
7. Board configuration opens the setup of the board. The action is only visible to the users granted the administration permission to the scaled board
Board list
Accessing the board list
Existing scaled boards are available in Scaled Boards → Manage boards.
Only users with permission to access Jira Scaled Agile Boards app can access the Scaled Boards menu.
Using the sidebar
Scaled Agile Boards sidebar allows you to change the context of the board list displayed:1. All boards displays all scaled boards that the user can view
2. My boards displays scaled boards created by the current user
3. Favourite boards displays scaled boards that were marked as favourite by the current user
Using the list
The board list displays the scaled boards available for the user along with the following information:1. Name - name of the scaled board. Clicking the name opens the board
2. Description - additional/detailed information about the board
3. Owner - user that owns the board (by default it’s the creator)
4. Permission - board permission level that was granted to the user

The user needs to be granted at least access permission to the board to see it on the list
Scaled boards can be marked as favourite by clicking the star icon. Favourite boards are also available in the Scaled Boards menu.
If the user was granted the administration permission to the board, he can open the configuration using the gear icon.
Board configuration
Accessing the board list
The configuration of scaled boards allows to change the behavior of the board in certain aspects and is organized into separate sections.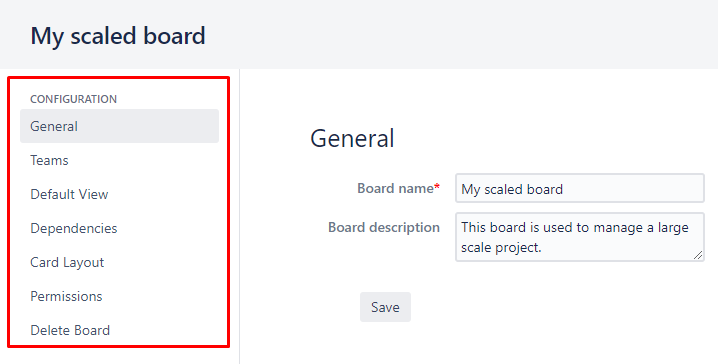
General
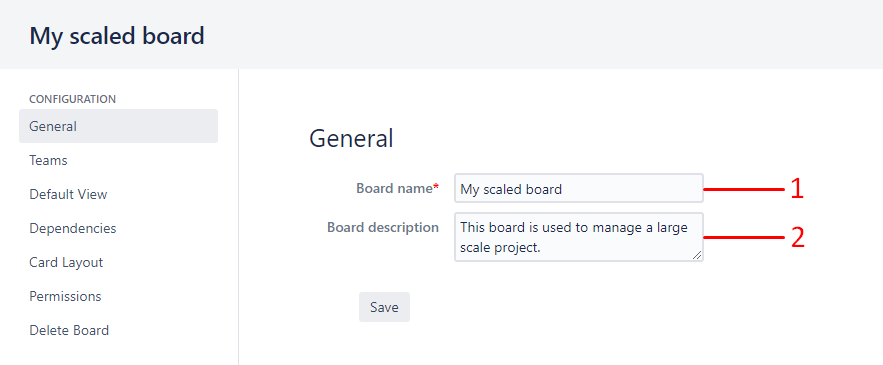
1. Board name - name of the scaled board
2. Board description - detailed information about the scaled board
Teams
Teams list allows defining the teams that will be working on a project that the scale board is created for.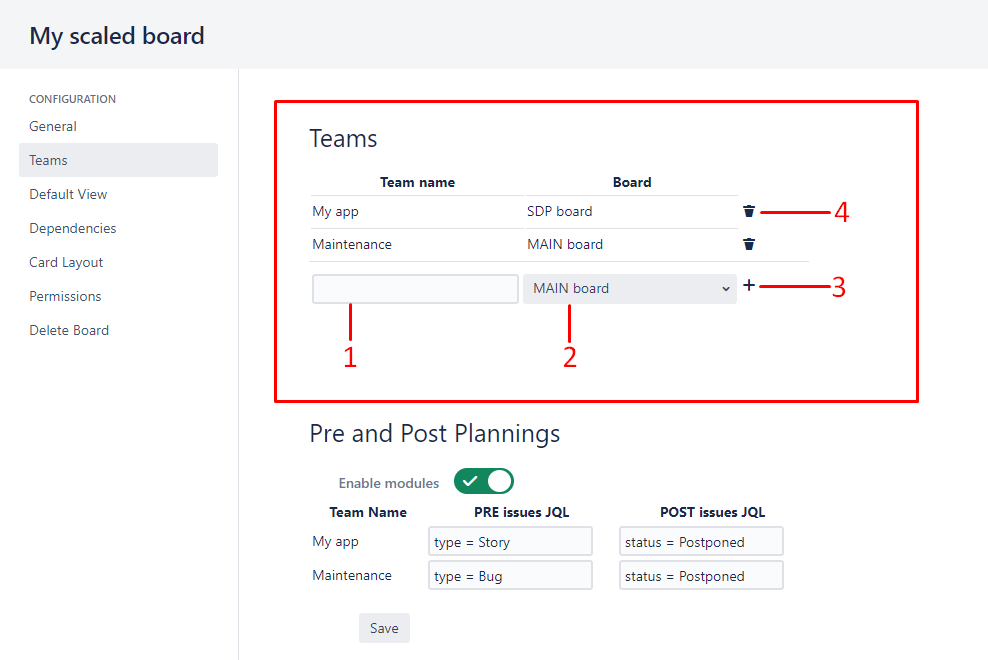
1. Team name - name of the team
2. Jira board - Scrum board related to the team
3. Add team - add the team to the list
4. Remove team - remove the team from the list
The first team added is considered to be the core team and its Scrum board will be the reference one for the scaled board in terms of start/end sprint dates. In order for the scaled board to work correctly, the Scrum board of the first team needs to have active sprints.
Pre and Post Plannings
Pre planning and post planning columns display the issues according to the applied filter. These columns can be used e.g. to see the upcoming tasks to be planned and the ones that were postponed for some reason.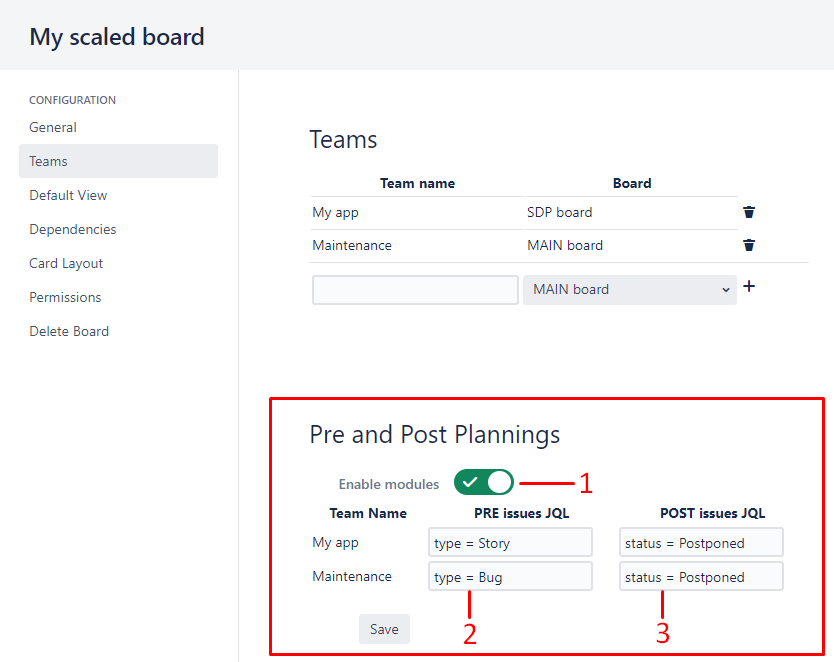
1. Enable modules - activate the pre planning and post planning configuration
2. Pre issues JQL - JQL query for filtering issues in the Pre Planning column
3. Post issues JQL - JQL query for filtering issues in the Post Planning column
Default View
The default view settings define how the board will be displayed by default.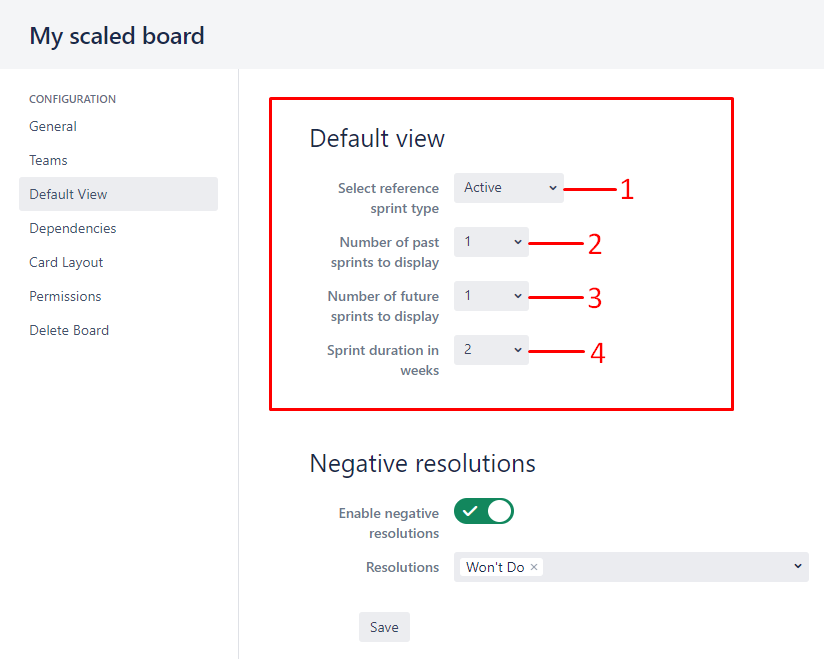
1. Select reference sprint type - sprint which will be focused
2. Number of past sprints to display - number of upcoming sprints that will be displayed
3. Number of future sprints to display - number of completed sprints that will be displayed
4. Sprint duration in weeks - number of weeks that the sprint lasts
Negative resolutions
Issues having the resolution set to the one marked as negative will be crossed out on the scaled board view. Such issues should be considered as not completed and abandoned in a way.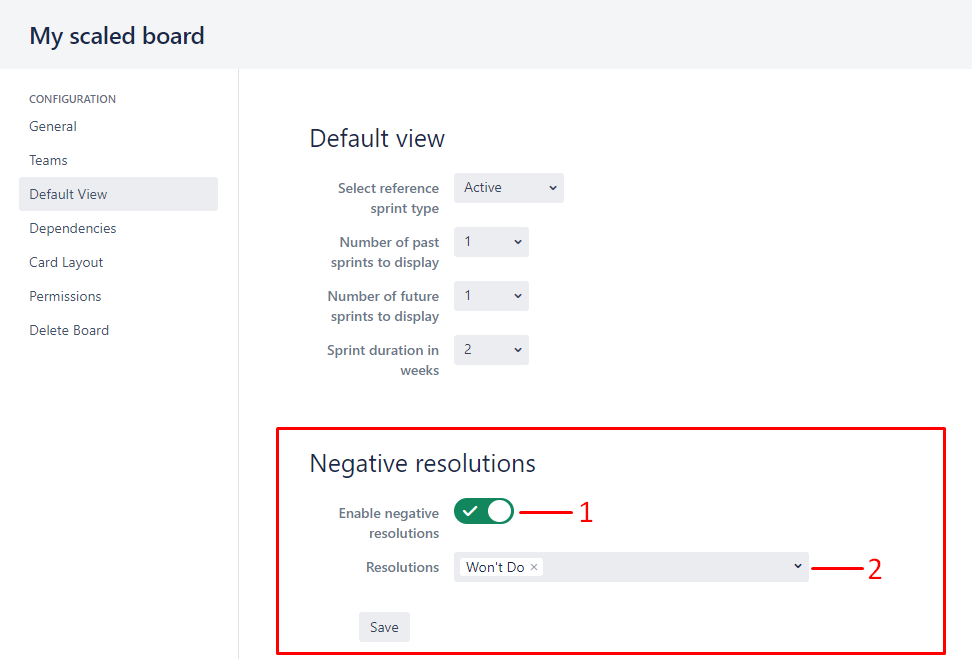
1. Enable negative resolutions - activate the negative resolutions configuration
2. Resolutions - resolutions that will be treated as negative
Dependencies
Define dependencies between issues that can be visualized on the scaled board.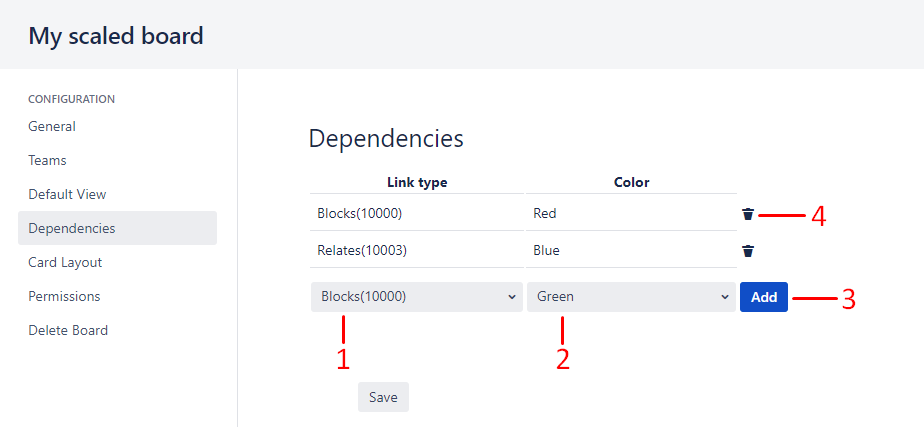
1. Link type - link type to be treated as the dependency
2. Color - color in which the dependency will be displayed
3. Add - add the dependency to the list
4. Remove dependency - remove the dependency from the list
Card Layout
Issues can be displayed as cards on the board view and here the layout can be configured.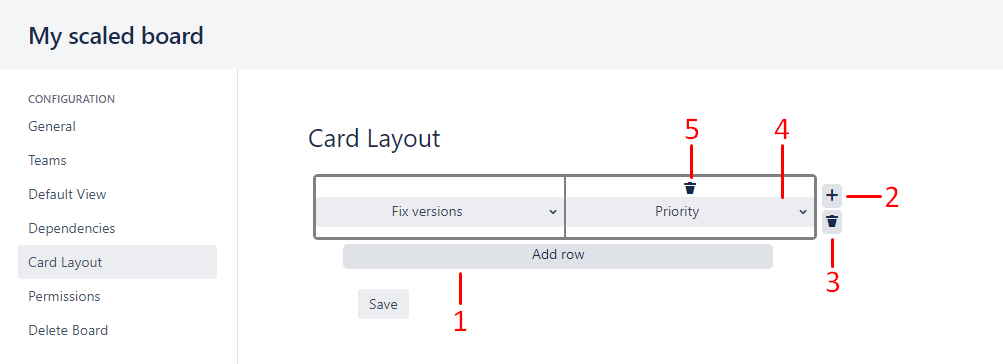
1. Add row - add a new row to add cells and set fields
2. Add cell - add another cell to the row
3. Remove row - remove the row from the layout
4. Field - field that will be presented on the card layout of the issue
5. Remove cell - remove the cell from the layout
You can have two rows and four cells in each row on your card layout.
Fields that can be set in the card layout are the Jira built-in custom field types and system fields. Non-standard fields introduced by other apps are not supported.
Permissions
Different levels of access to the scaled board can be granted to the users. Each permission can be granted to everyone, the owner or specific user groups.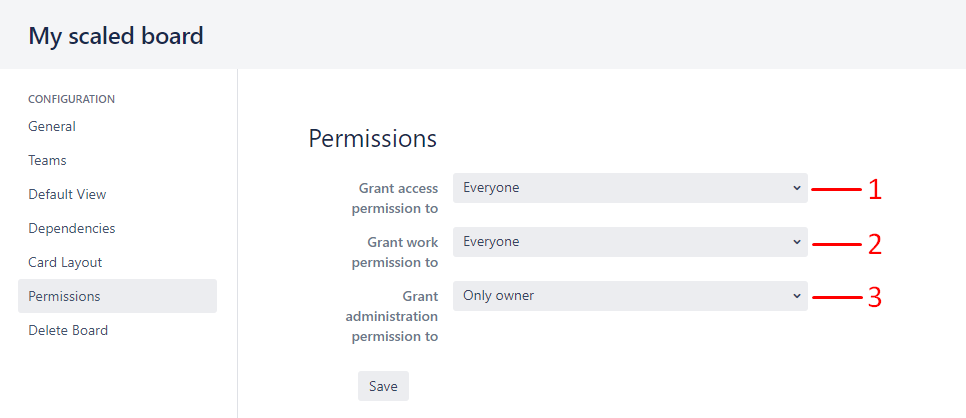
1. Grant access permission to - allows viewing the board without the possibility to move issues between sprints.
2. Grant work permission to - allows moving issues between sprints
3. Grant administration permission to - allows configuring the board
Global permissions defining the access to the JSAB app are superior to the board permissions i.e. if a user has access to the board, but doesn’t have access to the JSAB app, he will not be able to see the board.
The owner is the user that created the board.
Delete Board
Deleting the scaled board cannot be reverted.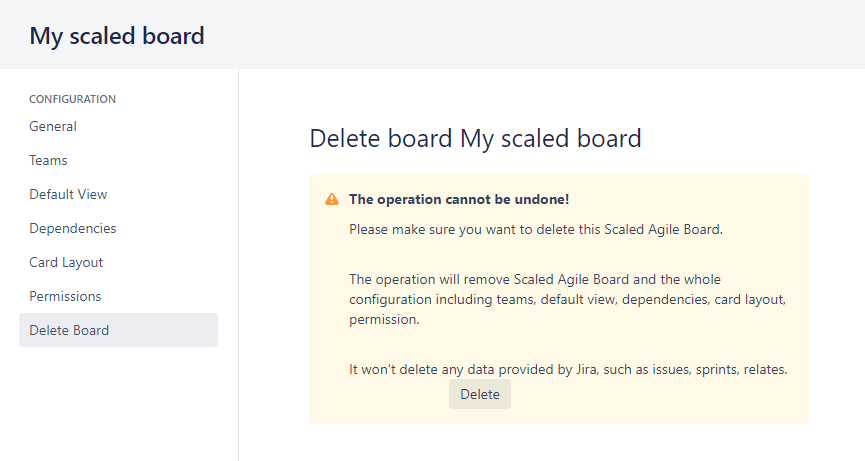
Global configuration
Jira administrators can set the global permissions in Jira Administration → Manage apps → Jira Scaled Agile Boards → Configuration. The following permissions can be set:-Access to JSAB - permission to access and use the app. Users without permission will not see the Scaled Boards item in the top menu.
-Create board - permission to create new scaled boards.

Each permission can be granted to Everyone or Selected groups.
If you decided to grant the permission based on Jira user groups, such groups need to be set in the Group field.
Support and troubleshooting
Support
If it happens that you come across a problem or have a question regarding JCNE, don’t hesitate and reach out to us through our support portal.The support portal hands you the following types of requests to categorize your needs:
-Defect for reporting problems, bugs and other malicious behaviors
-New feature for requesting improvements and new functionalities
-IT Help for all other general questions about installation, licensing or configuration
Working hours
Minty Minds support operates every weekday from 9:00AM - 5:00PM PST. Our support crew will answer you within 24 hours.
Troubleshooting
Before you decide to contact our support due to a malfunction found in our add-on, we encourage you to do the following in order to conduct basic analysis:-Make sure you are using the latest version of the add-on. If not, please update JCNE
-Enter the Safe Mode in Jira (for more information see Disabling and enabling apps) and enable JCNE only. Try to reproduce the defect. If the problem no longer exists, try to enable other apps one by one, testing JCNE each time. Finally, you should be able to find the app that is not compatible with JCNE and causes the malfunction
Test environment
It is highly recommended to test the Jira apps (or their updated versions) on a test environment prior to doing it on the production environment. Also testing the apps with Safe Mode should be performed on a test environment.
Reporting bugs
Finding a bug in a software application is always a disappointing experience. We do our best to keep our apps thoroughly tested, but if it happens that you encounter a bug, we encourage you to raise a defect ticket in our support portal. If you want to help our support crew solve your problem quickly, provide the following information:-Detailed reproduction steps so that our engineers can duplicate the defect in the test environment
-Screenshots or video files presenting the problems as evidence
-Log files from Jira. There are two ways to get the log files:
-Copy from the Jira Home Directory: JIRA_HOME\log\atlassian-jira.log
-Generate the support zip. For more information see Create a support zip
-Information about your Jira and JCNE versions
Supported versions
Our support may refuse to process your request if either the version of your Jira reached its EOL date or JCNE version is not the latest available.